
Looking to white label WordPress admin for your clients? If you’re an agency, freelancer, or developer managing WordPress sites for others, removing WordPress branding and replacing it with your own creates a more professional and trustworthy experience. This guide walks you through every step to fully white label the admin dashboard without any coding.
What Does White Labeling WordPress Admin Mean?
White labeling the WordPress admin means removing all default WordPress branding and replacing it with your own. A fully white labeled admin dashboard typically includes:
- Custom login page – Your brand colors, logo, and background instead of the WordPress default
- Custom admin colors – Sidebar menu, admin bar, and buttons matching your brand
- Custom sidebar logo – Your logo at the top of the admin menu instead of the WordPress icon
- Hidden WordPress branding – Remove the WordPress logo from the admin bar
- Clean admin interface – Hide screen options, help tabs, footer text, and update nags
- Restricted access – Clients only see the menus they need, with blocked access to technical settings
The result is a dashboard that looks like it was built specifically for your client, with no trace of WordPress branding anywhere.
Why Agencies Should White Label WordPress Admin
Here’s why white labeling matters if you manage client sites:
- Professional perception – Clients see your brand everywhere, reinforcing trust and quality
- Fewer support requests – A simplified dashboard means clients don’t get confused by options they don’t understand
- Prevents accidental damage – Hiding Plugins, Appearance, and Settings menus stops clients from breaking things
- Justifies your fees – A branded, polished experience feels like a premium product
- Client retention – When everything looks custom-built, clients are less likely to try managing the site themselves or switching to another provider
How to White Label WordPress Admin (Step by Step)
We’ll use Incognito Admin Manager to white label the entire WordPress admin area. The free version covers login pages and admin colors. The Pro version adds custom logos, cleanup options, and advanced access restrictions.
Part 1: Brand the Login Page
The login page is the first thing clients see. Make it yours.
- Go to Incognito Admin → Login Screen
- Enable the custom login screen toggle
- Upload a background image that represents your brand or the client’s brand
- Set background color, card color, text color, accent color, and button color to match your brand palette
- Check “Hide WordPress Logo” to remove the WordPress logo from the login page
- Save changes
Your login page now shows a modern split-screen design with your branding instead of the generic WordPress login.
Part 2: Customize Admin Colors
Next, change the admin dashboard colors to match your brand.
- Go to Incognito Admin → Admin Theme Styler
- Make sure the “Enable” toggle is on
- Set your brand colors for:
- Menu Background – Sidebar background color
- Menu Text – Sidebar text and icon color
- Menu Hover – Background color when hovering over menu items
- Active Menu Item – Background color for the current page
- Admin Bar – Top bar background and text colors
- Buttons – Primary button background and hover colors
- Use the live preview on the right side to see changes in real time
- Save changes

Part 3: Hide WordPress Branding
Remove all remaining WordPress branding from the admin area.
- Hide WordPress Logo – In Admin Theme Styler, check “Hide WordPress Logo” to remove it from the admin bar
- Custom Admin Logo (Pro) – Upload your own logo to appear at the top of the admin sidebar menu. This replaces the WordPress icon with your brand.
- Hide Footer Text (Pro) – Remove the “Thank you for creating with WordPress” text from the admin footer
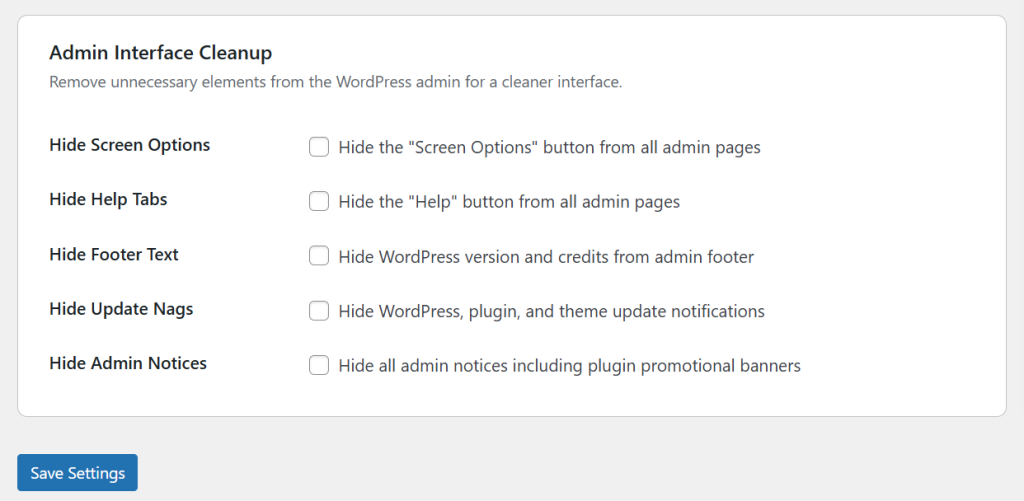
Part 4: Clean Up the Admin Interface (Pro)
Remove WordPress clutter that confuses clients:
- Hide Screen Options – Removes the “Screen Options” button from all admin pages
- Hide Help Tabs – Removes the “Help” button from all admin pages
- Hide Update Nags – Removes WordPress, plugin, and theme update notifications
- Hide Admin Notices – Removes all admin notices including plugin promotional banners
With these options enabled, clients see a clean, distraction-free dashboard that feels purpose-built.
Part 5: Restrict Menu Access Per Role
The final step is hiding menus that clients don’t need.
- Go to Incognito Admin → Access Roles
- Select the role your client uses (usually Editor or a custom role)
- Check the menus to hide: Plugins, Appearance, Settings, Tools, Users, and any others they shouldn’t access
- Choose “Block & Show No Access Page” mode (Pro) to prevent URL bypassing
- Save changes
Now the client only sees menus relevant to their work — Posts, Pages, Media, and whatever else you’ve left visible.
Part 6: Apply Styling to All Users (Pro)
By default, admin theme colors only apply to non-administrator roles. If you want your own admin account to also see the branded colors (for consistency when demoing to clients), enable the “Apply to Administrators” toggle in Admin Theme Styler.
White Label Checklist
Use this checklist to make sure you’ve covered everything:
- ☐ Custom login page with brand colors and background image
- ☐ WordPress logo hidden from login page
- ☐ Admin sidebar and admin bar colors match brand
- ☐ WordPress logo hidden from admin bar
- ☐ Custom logo uploaded to admin sidebar (Pro)
- ☐ Footer text hidden (Pro)
- ☐ Screen options and help tabs hidden (Pro)
- ☐ Update nags and admin notices hidden (Pro)
- ☐ Unnecessary menus hidden for client’s role
- ☐ Direct URL access blocked for hidden pages (Pro)
- ☐ Custom login redirect set for client’s role (Pro)
Free vs Pro for White Labeling
Here’s what you get with each version:
| Feature | Free | Pro |
|---|---|---|
| Custom Login Screen | ✓ | ✓ |
| Admin Theme Colors | ✓ | ✓ |
| Hide WP Logo from Admin Bar | ✓ | ✓ |
| Live Preview | ✓ | ✓ |
| Access Role Restrictions | ✓ | ✓ |
| Custom Admin Sidebar Logo | ✗ | ✓ |
| Block Access & Restricted Page | ✗ | ✓ |
| Admin Cleanup (5 options) | ✗ | ✓ |
| Apply Styling to Admins | ✗ | ✓ |
| Custom Login Redirect per Role | ✗ | ✓ |
| Hide Frontend Admin Bar per Role | ✗ | ✓ |
The free version gives you a solid white label foundation. The Pro version completes the experience with full branding, cleanup, and access control.
Frequently Asked Questions
Will clients know the site runs on WordPress?
With a fully white labeled admin, clients won’t see any WordPress branding in the dashboard. The login page, sidebar, admin bar, and footer all show your branding instead. The frontend of the site may still have WordPress indicators (like the meta generator tag), but the admin experience will be completely branded.
Can I use different branding for different client sites?
Yes. Each WordPress installation has its own settings. You can configure different colors, logos, and restrictions for every client site you manage.
Does the Pro license cover multiple client sites?
Yes. One Pro license ($49 lifetime) covers unlimited WordPress sites with no recurring fees. This makes it ideal for agencies managing many client sites.
Conclusion
White labeling the WordPress admin transforms a generic dashboard into a professional, branded experience that clients love. With Incognito Admin Manager, you can white label WordPress admin completely — from the login page to the sidebar menu, admin bar, and access restrictions — all without writing a single line of code.
Start white labeling today: